
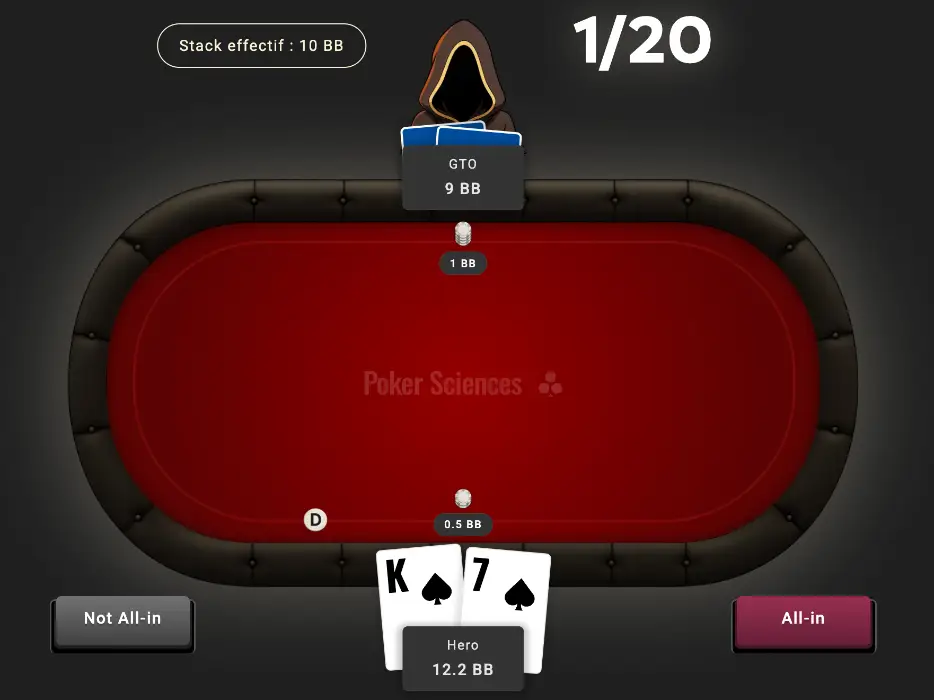
In this first chapter, you’ll learn to master push hands from the Small Blind in Heads-Up situations.
This is an extremely frequent and highly profitable situation that you must know by heart, especially between 0 and 7 BB, since the slightest mistake can cost you a lot of EV.
In this chapter, we’ll focus on the GTO push ranges from the Small Blind in Heads-Up (HU). These are the theoretically optimal ranges to use:
• Against unknown or competent players (if you’re already playing at €5/€10+ levels).
• Or against recreational players when you have less than 6–7 BB, since your postflop edge becomes too small to justify an exploitative strategy.

⚠️ Above 6–7 BB, however, the optimal strategy is no longer GTO versus recreational players. But be patient, we’ll see that in Chapter 2, which focuses on the Exploitative SB HU strategy.
This first chapter (and the next one as well) is a bit special because we’ve simplified the possible answers, there are only two options:
We made this choice because, from a pedagogical point of view, it’s more effective to first learn how to choose between these two actions only.
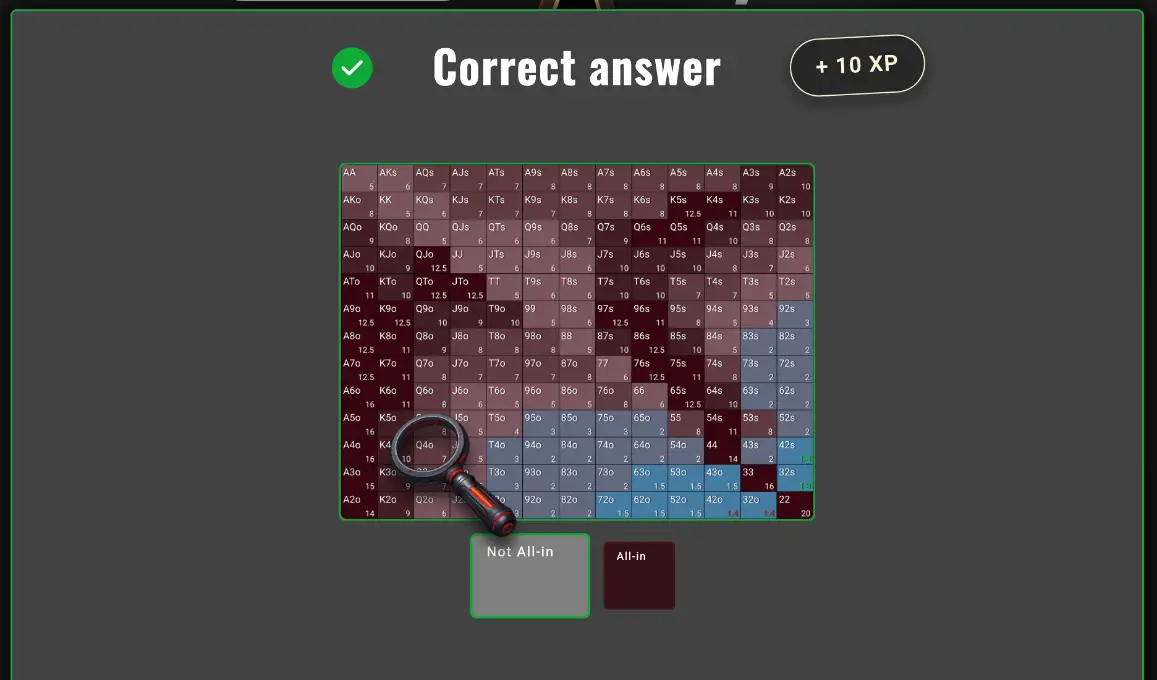
If you’re not sure how to read these Push Charts (with numbers inside the boxes), we recommend checking the dedicated help section: Charts: Going Further.
3️⃣ In Chapter 3, we’ll revisit these ranges, but this time replacing “Not All-in” with the actual action: Fold? Limp? Raise?
These ranges require some effort, as you need to know at which stack depth each hand becomes a push.

A few useful reference points:
• The SB pushes all hands from 1.4 BB.
• The SB pushes all suited hands from 1.8 BB.
There are two possible approaches to learning these Push Charts:
Learn through practice — by trial and error directly in the Trainer.
Memorize each hand and the effective stack depth where it becomes a push.
1.4 BB → 42o, 32o
1.5 BB → 63o, 53o, 43o, 72o, 62o, 52o
1.8 BB → 42s, 32s
2 BB → 94o, 93o, 92o, 84o, 83o, 82o, 74o, 73o, 65o, 64o, 54o, 43s, 63s, 73s, 83s, 82s, 72s,
62s, 52s
3 BB → T4o, T3o, T2o, 95o, 85o, 75o, 92s
4 BB → T5o, 93s
5 BB → J5o, J4o, J3o, J2o, T6o, 96o, 86o, 84s, 94s, T2s, T3s, 88+, TT+, JJ+, QQ+, KK+, AA
6 BB → Q2o, J6o, 66–77, J2s, AKs, KQs, QJs, JTs, T9s, 98s, QTs, Q9s, J9s, J8s, T8s
7 BB → AQs, AJs, ATs, KJs, KTs, K9s, Q8s, T5s, T4s, J3s, J7o, T7o, 97o, Q3o, Q4o
8 BB → A9s–A4s, K8s–K6s, Q2s–Q3s, J4s, 95s, 74s, 53s, 55, 76o, 87o, 98o, T8o, J8o, Q7o–
Q5o, KQo, AKo
9 BB → AQo, KJo, J9o, Q8o, K3o, K2o, Q7s, A3s
10 BB → AJo, KTo, K5o–K4o, Q9o, T9o, A2s, K3s–K2s, Q4s, J5s–J6s-J7s, T7s–T6s, 87s,
85s, 64s
11 BB → ATo, K8o–K6o, K4s, Q6s–Q5s, 96s, 75s, 54s
12.5 BB → A9o–A7o, K9o, QJo, QTo, JTo, K5s, 97s, 86s, 76s, 65s
14 BB → A2o, 44
15 BB → A3o
16 BB → A6o–A4o, 33
20 BB → 22
👉 It’s up to you to choose the method that suits you best. And don’t worry — for the following chapters, you’ll have far less to memorize.