
In this final chapter about Button play, we’ll focus on a specific case of 3-handed play: asymmetric stacks.
This is a concept we haven’t discussed until now, so it might be new to you.
But don’t worry — we’ll explain everything clearly.
Before looking at the strategic adjustments, it’s important to understand what we mean by a symmetric and an asymmetric situation.
So far, we’ve always implicitly assumed that we were in symmetric situations — meaning all players had roughly the same stack sizes.
For example:
The charts you’ve studied so far were all built based on this symmetric stack assumption.
☝️ This simplification is both necessary and very common, because poker situations are almost infinite.
It’s simply not possible to cover all possible cases with charts while keeping the system humanly learnable.
We talk about an asymmetric situation when players have very different stack sizes.
One player might be much shorter, or on the contrary very deep.
For example:
In this case, the decisions of each player change: the short stack (SB) will shove more often, which impacts our own strategy.
🧠 The goal of this chapter isn’t to give you exact combo-by-combo actions for every asymmetric situation — as we said earlier, there are infinitely many possible setups.
Instead, we’ll look at the main adjustment principles depending on the three most common asymmetric cases.
Typically, when you’re unsure about a borderline hand, the knowledge from this chapter will help you lean toward the right decision.
Broadly speaking, we can identify three frequent cases (assuming you’re on the Button). Of course, the stacks below are just examples — there are countless possible variations.
1️⃣ Case 1: 10 BB 10 BB (you, BTN) – 25 BB (SB) – 40 BB (BB) → you are short
2️⃣ Case 2: 25 BB (you, BTN) – 10 BB (SB) – 40 BB (BB) → SB is short
3️⃣ Case 3: 25 BB (you, BTN) – 40 BB (SB) – 10 BB (BB) → BB is short
We could also mention the case 35 – 5 – 5, where you’re very deep and both opponents are short, but that’s extremely rare in practice. Note that it would play very similarly to Case 1.

Let’s take the situation where you are on the Button with a much smaller stack than your opponents.
In reality, there’s no special adjustment to make here.
For example: 7 BB (you, BTN) – 25 BB (SB) – 25 BB (BB)
If we look at this spot in a solver such as GTO Wizard and compare it to the case: 7 BB (you, BTN) – 7 BB (SB) – 7 BB (BB).
We’ll find that the GTO charts for the Button are almost identical.

It may look surprising, but these apparently different situations are actually very similar from a GTO perspective.
✅ And this generalizes to all asymmetric 3-handed spots where you are the short stack on the Button.
So, there’s no real adjustment needed — you can keep following the charts from Chapters 5 and 6.
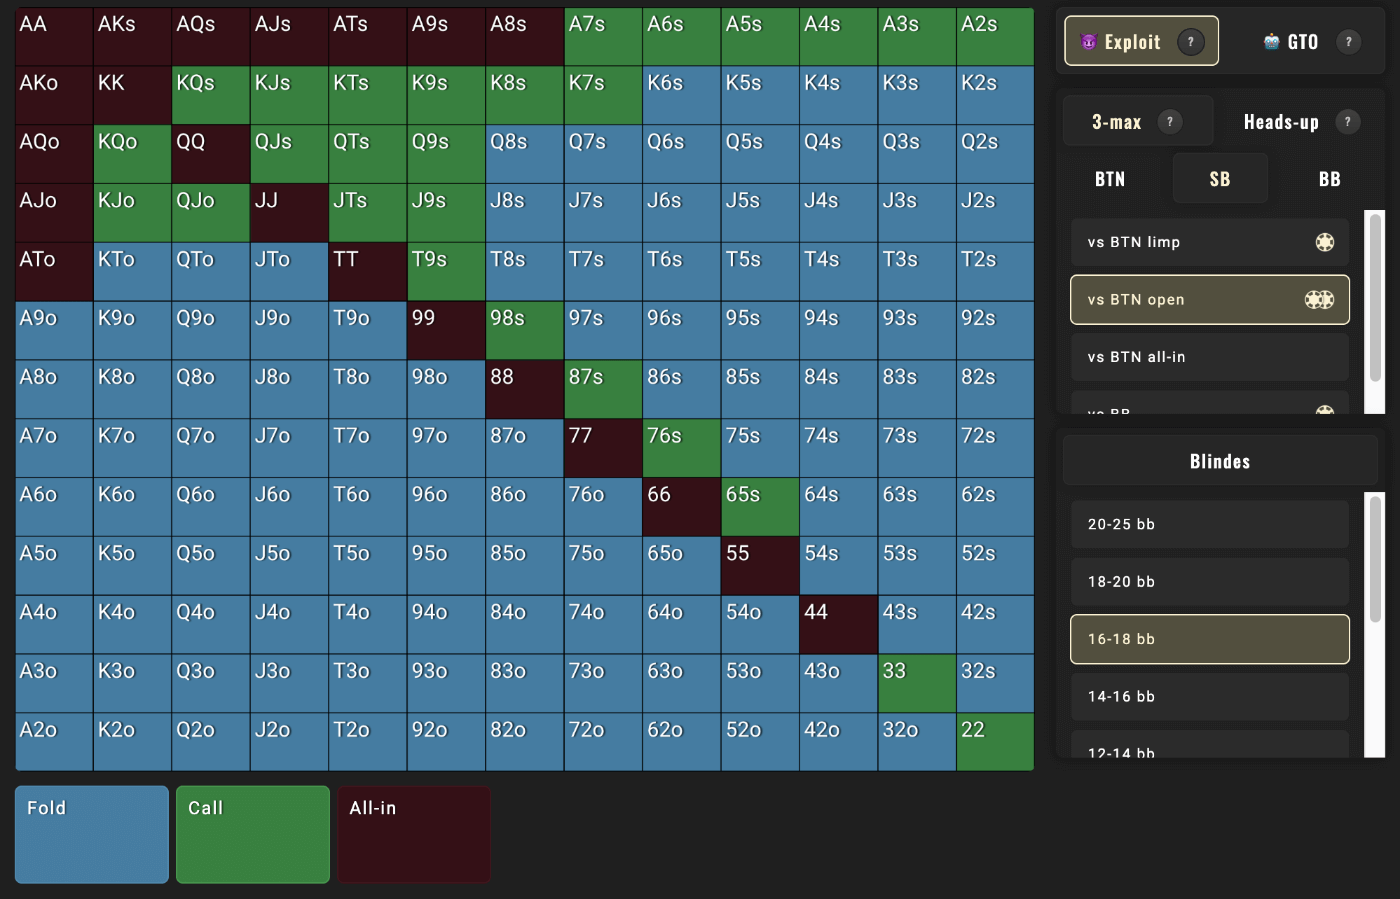
These are the most strategically interesting and also the most common in practice.
In these situations, the short stack will naturally play more aggressively preflop.

This extra pressure affects our Button strategy in two main ways:
When players behind you have stacks that make them likely to shove, you should reduce your opens with weak hands that can’t call a 3-bet shove.
This is usually a slight but real adjustment — hands at the very bottom of your Button range can simply be folded.
Example:

You can see that in the asymmetric stack case, the Button should open slightly tighter than in the symmetric situation.
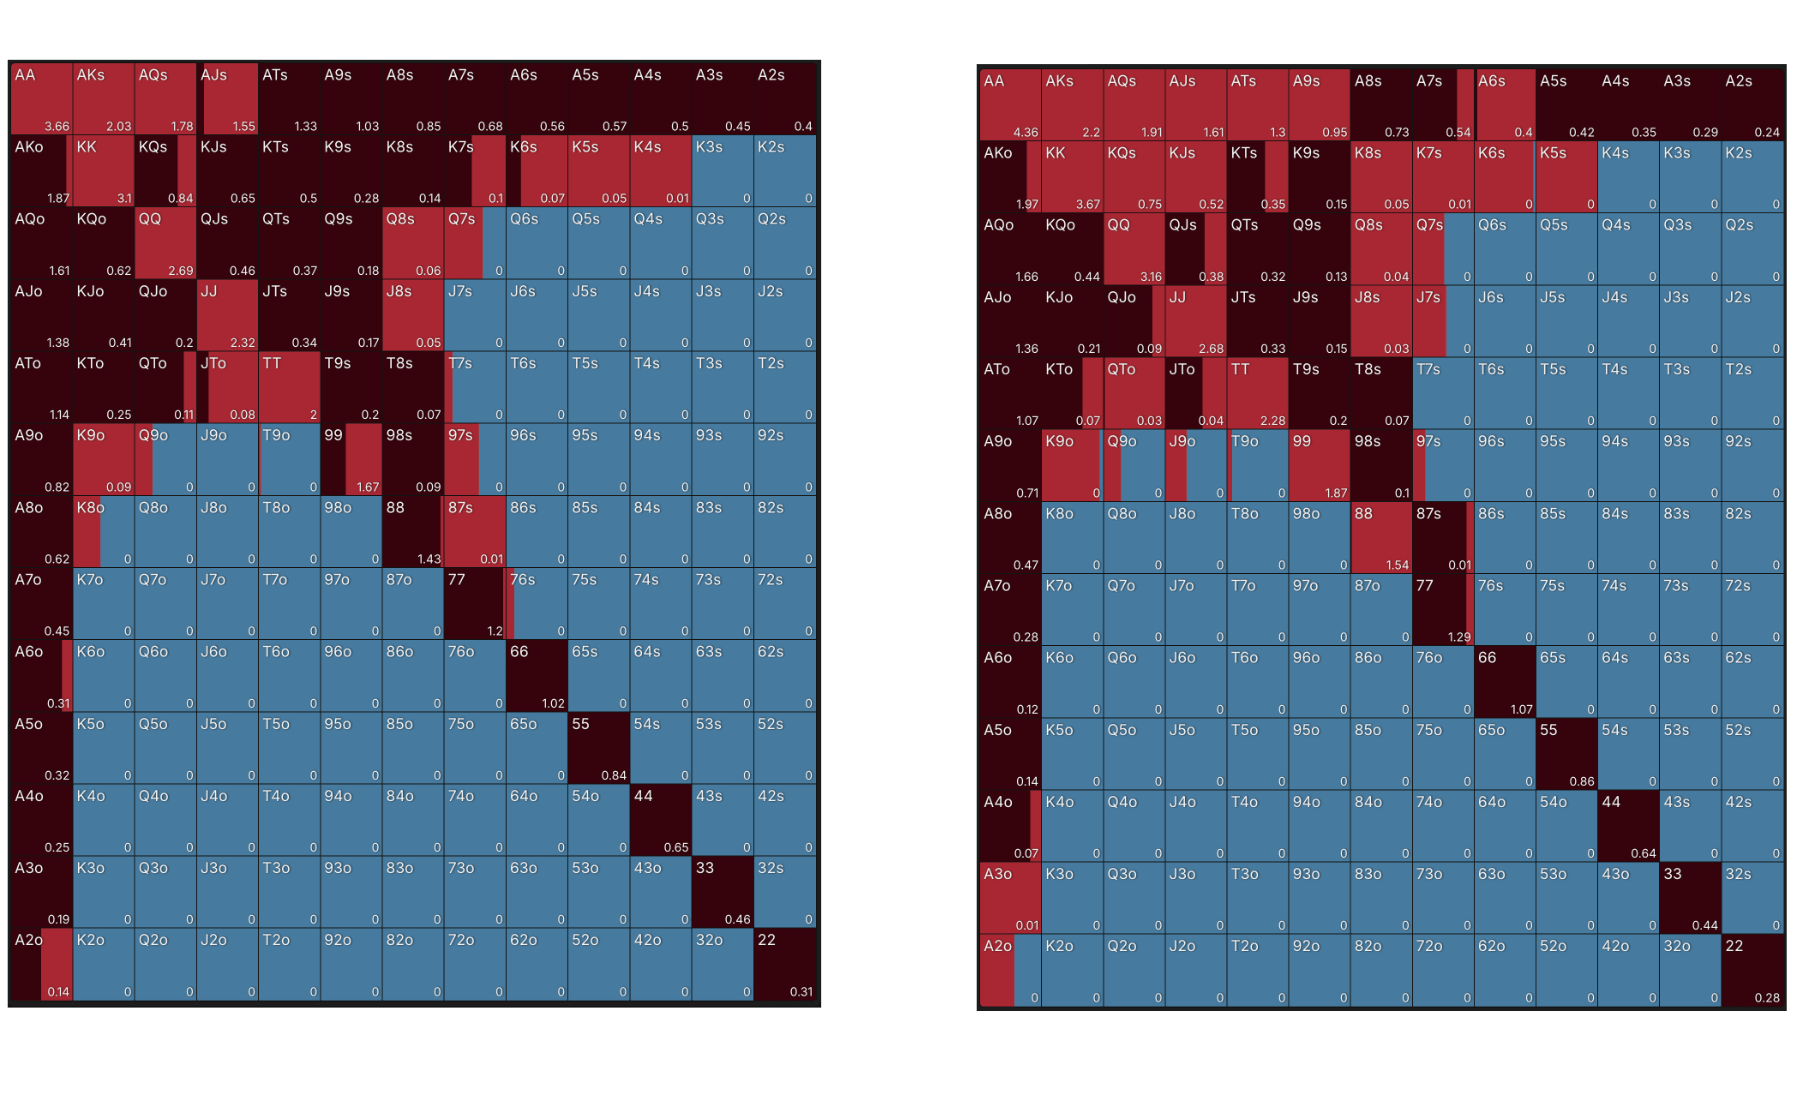
Some hands fall into an intermediate zone: They’re too strong to fold, but not strong enough to min-raise and face a possible re-shove from your opponent.
For these hands, the best option often becomes a direct all-in.
Example at 17 BB:

You can see that in the asymmetric situation (left), hands such as KTs, QJo, A2s, etc. can be profitable open-shoves, whereas in the symmetric situation they would be played as standard min-raises.
Another example at 12 BB:
In Chapter 6, we saw that we could replace some open-shoves with min-raises (for hands that play well postflop and are at risk of being dominated if called), because opponents didn’t use the 3-bet shove often enough.
Thanks to the comparison above at 12 BB, you can see that this is less true when the opponent is short.
🧨 Especially if the opponent just lost a big pot and is potentially on tilt — which increases their likelihood of shoving. You don’t want to min-raise and then have to fold too often.
For those who like precision.

Above, we grouped cases 2 and 3 together, assuming that it didn’t really matter whether it was the SB or BB who was short.
In reality, there’s a small difference:
When the SB is short, she still has a player behind her (the BB), so she can’t shove as freely as the BB.
The Button can therefore keep a slightly wider opening range when the SB is short, compared to when the BB is short. This is because the BB, being last to act, has more freedom to re-shove aggressively.
🤏 This nuance exists, but it’s fairly minor.
Once again, the goal isn’t to memorize dozens of different charts, but rather to understand the general principle so you can adapt effectively in practice.